|
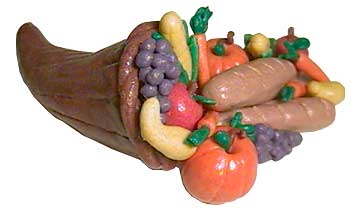
Salt Dough Cornucopia
With just a few simple ingredients you can create this fun Salt Dough Cornucopia for your Thanksgiving day celebration.
Materials:
Salt dough recipe (below)
Craft Bond gloss finish decoupage
Paintbrush
Glue gun
Acrylic paints: brown, yellow, orange, green, red and purple
Salt dough:
2 cups all-purpose white flour
1 cup salt
1 cup boiling water
Combine boiling water and salt in a bowl. Mix well. Slowly mix in 2 cups of flour. Place dough on work surface and wearing plastic gloves, knead it until smooth. If dough is sticky, continue adding small amounts of flour.
Instructions:
Make dough recipe (above). To color the dough, work small amounts of paint into the dough until desired color is achieved. You may have to work in a little flour when adding paint to keep the dough from being too sticky. The dough should be slightly sticky but easy to shape.
Cornucopia:
Using brown clay, mold a cone shape about 4 1/2-inches long and 2 1/4- inches in diameter at wide end. Mark lines 1/2-inch apart along sides from wide end to narrow end. Press in the wide end so the cone is slightly caved (see fig. 1) Roll 2 - 1/4 x 8 inch snakes. Twist snakes together and attach around wide edge. Cut off excess. Bend slightly so the cone is C-shaped.
Pumpkin:
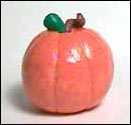
Using orange clay, form a 1 1/4-inch ball. Mark 8 lines with a butter knife from center top to center bottom of ball. Using the bottom end of the knife, press a dent in the center top of the ball. Make a ½-inch cone shape with green clay. Stick the point of cone in the indent at the top of the pumpkin (stem). Roll a small snake with brown clay. Twist the snake slightly and stick one end into the indent with the stem 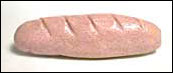
Crookneck squash:
Using yellow clay, roll out a 1 1/4-inch oval making one end narrow and one end fat. Bend the narrow end slightly.
Grapes:
Using green clay, roll a 1-inch narrow snake. Twist into a spiral. Using purple clay roll approximately 20 3/16-inch balls. Shape balls into a triangle and stick the green spiral into the fat end of triangle.
Apple:
Using red clay, roll a ¾-inch ball. Using bottom end of butter knife, press a dent in the top of apple. Using brown roll a 5/16-inch triangle and stick the point into the dent in the apple. Using green form a small leaf and stick one end of the leaf into the dent in the apple.
Corn:
Using yellow clay, roll a 1 1/2 x 3/8-inch oval. Using a butter knife, mark lines lengthwise and widthwise in checkerboard fashion. Using green clay, shape 5-6 leaves of various lengths. Layer leaves around one end of the corn. Press bottom of leaves together to form a point.
Carrot:
Using orange clay, roll a 1 1/4-inch snake. Make one end into a point. Poke the other end with the tong of a fork to create a dent. Using green clay, create 3-4 very small snakes. Pinch these snakes at one end and poke the pinched end into the dent in the carrot.
Bread:
Using tan clay, roll a 2 1/2-inch oval. Make slanted slits across the top of the bread.
Finishing:
Bake figures in a 200 ° oven for 1/2-hour for every 1/4-inch thickness. Bake pieces until they are completely hard. Let cool.
Paint decoupage finish on each piece. Let dry.
Arrange pieces and glue together with a glue gun.
"Thankful Harvest" Wallhanging
by: Mary Wilkins
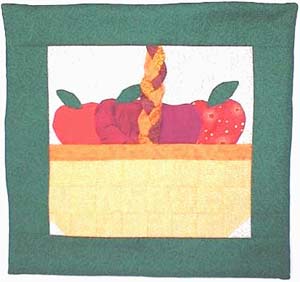
As I look out my dining room window I can see endless shades of yellow, golds, reds and orange. Maybe that's why I chose these colors for my "Thankful Harvest" wallhanging. This would make a lovely gift for anyone who appreciates Mother Nature's real beauty.
Fabrics on hand and a picture were all I had to guide me. These are my own directions that I scribbled down as I put the block together.
You can apply the pieces in any number of ways. I machine stitched everything but the handle. You can hand or machine applique, or use fusible backing and a machine satin stitch. The choice is yours. When I am inspired, I see the whole picture, the details are left to struggle with later.
DIRECTIONS:
The basket consists of 3 rows of 8 2" gold squares sewn together. The gold squares give a woven effect, like a basket. The bottom corners are half square triangles from the basket fabric and background fabric.
Top ridge on the basket is a strip of contrasting fabric 1 1/4" wide. Sew to top row of squares.
Cut piece of background fabric same size as basket. Fold in half from left to right, press to mark middle. DO NOT SEW TO BASKET TOP YET.
Handle fabrics are in colours that co-ordinate with basket. You need 3 strips 1 1/2" wide and twice as long as the background fabric. Stitch long edges. Press each strip with seam centered in middle.
Braid 3 fabrics together, keeping raw edges to the back. Place braid over pressed middle mark. Hand tack at top and bottom, then hand sew down edges carefully. Make sure your braid is straight.
Cut out 4 apple shapes as shown from various red fabrics. The apples are about 3"-4" high and wide. Arrange on background fabric at bottom edge.
Cut leaves from green print fabric, about 2 1/2" long and 1" at widest part. Arrange on apples and sew. Now the top half of your block is complete. Sew top half to bottom half along raw edges.
Now is the time to straighten up your outside edges. When you sew by the seat of your pants like this, the edges are sure to be a little wonky.
Once the block was complete, I cut 4" strips of dark green (same print as leaves). Sew the strips to the left and right side, then top and bottom.
The green cooled down the intense, warm colours of the reds and gold and made a nice border.
This block can be used for a small wallhanging, a block for a sampler quilt or to apply to a tote bag. The choice is yours again.
Designed and created by Mary Wilkinshttp://www.sew-whats-new.com
|  |
|
Apple Dolls 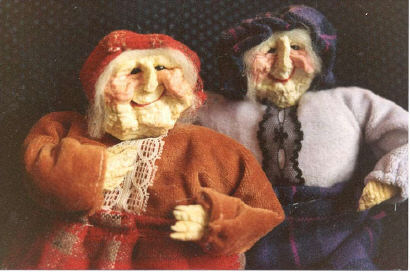
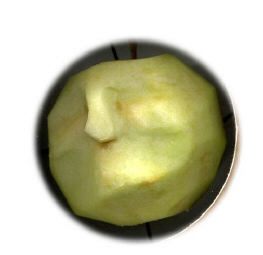
How to Make an Apple Doll Head
Supplies: Apples, paring knife, lemon juice, salt, wire or stick, red water color paint, black "e" beads, carded wool or ? for hair.
1. Select an apple (green or red) medium or large size. Choose an apple that is not too soft. Peel the apple
2. With a paring knife, cut a U-shaped line for the nose.
3. Remove wedges of the apple by cutting towards the cut lines of the nose. This brings the profile of the nose forward
4. Cut wedges out of the apple under the nose, under the cheeks and where the eyes will be.
5. Cut slits for eyes. Cut a line for the mouth. Shape the chin & other areas. Add light lines around eyes & on forehead to add wrinkles.
6. Soak apple (for about 5 min.) in water with 2 T. salt & lemon juice added. Insert a wire or stick into apple and hang to dry, or place on a rack.Peel another apple without carving & dry for hands
7. Drying may take several weeks. Humid weather may make it harder to dry the apple, sometimes it may mold instead. Try drying apples in drier weather or inside a heated room. If you dry the apple in summer humidity, try placing the apple by a fan, or in a hot car on the dash. A dehydrator may be used instead.
8.The apple is ready when spongy dry. Pinch or re-cut lines if face needs reshaping. Insert beads sideways into eye slits. Add water to red water color paint to paint light pink cheeks & a little darker pink for the mouth.
9. Glue hair to the top of the head.
10. From the plain dried apple (or back of apple face) cut wedges with a scissors to form hands. Cut slits in hands for fingers.
 Sewing Apple Doll Clothes - Granny or Grandpa 1. Use stretchy material. Socks are 3"w x 6"h, folded in half. cut material so sock stretches width wise. Fold in 1/2 and stitch along bottom and side, leaving top open. Turn inside out.
2.Double material so fold is on top edge of the shirt. Shirt is 9" wide at top fold, 2" wide sleeves & 5" wide across bottom.
3. Turn up edge on sleeves, gather while sewing. Sew sides of shirt.
4. Turn inside out.
5. Skirt is 15" w x 9 1/2" h. Apron is 8" w x 5"h. Hem apron on 3 sides.
6. Lay apron on top edge of skirt. Turn top edge over. Sew & gather top edge. Hem bottom of skirt
7. Fold skirt in half. Sew side seam.
8. turn inside out. Skirt with apron attached!
9. Pants are 6" w x 10" h. cut 2. cut slit 5 1/2 " from bottom for legs.
10. Sew one side of pants
11. Open and turn top of pants under. Sew & gather top edge. Sew other side of pants and inside of legs. Turn inside out.
12. Cut strips of leather or vinyl for suspenders.
13. Hat. From felt, cut 2 half circles. Sew along curved edge. Turn inside out. cut circle with hole. Glue bottom hat, slipping brim over hat.
Making the Apple Doll Body & Finishing the Doll
1. Shape body with wire, starting at the top, leave about 2" of wire then bend to the right. Loop to make arm then bend back to the middle. Wrap around center & make loops for other arm& legs.Cut with wire cutter & wrap remaining wire around middle.
2. Wrap a scrap of material around center of body.
3. Place fiberfill around center & wrap with yarn. continue to add fiberfill to arms & legs, wrapping yarn tightly to secure. Leave some of the wire unwrapped at the end of the arms. Wrap entire legs.
4. Cut small hole in middle top of shirt. Pull shirt on with wire going through the top of the shirt. Pull on skirt or pants. Glue inside of skirt at waist in a few spots to secure. Place lace through wire or add shawl. Add suspenders to pants, gluing inside of pants. Pull socks on the legs. Turn up ends to form feet.  5. Push head through wire. bend wire back to secure. Tie scarf on the head or glue hat on. Place hands between wire at end of arms. Wrap wire around hands to secure
Your apple doll is finished & can be posed to either sit or stand!
for step by step pictures http://pages.prodigy.net/pmatson1/
 Scented Apple Wreath
Apples and spice dried slice by slice, that's what this wreath is made of. And the wreath is wonderfully easy to assemble, even for kids. You simply fold pliable apple slices - dried in the oven or microwave - and thread them onto a wire frame. Hang the wreath with a colorful looped bow.
You will need:
Juice of 9 lemons
2 tsp salt
8 to 10 large firm apples (Rome Reds or Ida Reds are preferred, or use any firm apple)
Ground spices: 6 tsp cinnamon, 2 tsp allspice, 1 tsp cloves, 2 tsp orrisroot powder (Note: Spices will not only add a pleasant aroma but also will act as a natural food preservative)
8"-10" heart shaped wire frame that can be open or closed by unhooking two ends (or 8"-10" length of heavy gauge wire)
1 1/4 yd of 1" wide blue and white checked ribbon
Floral wire
Tools:
sharp knife
paper towels
mortar and pestle or small bowl and spoon
small kitchen sieve or tea strainer
pastry brush
broiler pan or wire screen
pliers
scissors
Directions:
Pour freshly squeezed lemon juice into a medium-sized bowl, add salt and blend well.
Peel and slice apples horizontally into 1/8" to 1/4" thick circles. Core apple slices as needed. Soak slices in the lemon juice mixture for 6 minutes, turning once. Make sure slices are covered completely.
Remove slices from bowl and place on paper towels. Pat dry with more paper towels to absorb excess liquid.
Combine the ground spices and blend well, using a mortar and pestle or small bowl and spoon. Using a small kitchen sieve or tea strainer, dust apple slices with the spice mixture. With a pastry brush, gently remove excess spice mixture. Turn apples slices over and repeat the procedure.
Place apple slices in a single layer on a broiler pan or wire screen. Dry in conventional oven at 150 - 200 degrees F for six hours or until evenly dried. If using a microwave oven, dry apple slices for 4 - 6 minutes at low to medium heat. Let slices cool. If not dried thoroughly, return slices to oven. Apple slices will be pliable.
Straighten both ends of the heart-shaped wire frame with a pair of pliers. Fold apple slices into halves, then into quarters and "thread" them onto wire frame. When frame is completely covered with slices, use pliers to bend both ends back into "hooks" so they can be reconnected.
Using checked ribbon, make a large bow with a loop for hanging. Attach a bow to wreath with thin floral wire.
These crafts courtesy of Family Circle Weekend Crafts
|
| |
|
|
|
|
|
For the Kids 
Scarecrow Wall Decoration
It is a scarecrow made out of two hats, raffia, felt and a pipe cleaner. It is easy for kids 8 and up and seniors.
Parental supervision is recommended.
This project is rated EASY to do.
What You Need
2 Straw hats - 16 inch and 12 inch
Raffia
Felt
Pipe cleaner
Ribbon
Tacky craft glue or hot glue gun
How To Make It
Cut the 12" hat in half.
You will need a small package of colored raffia (if available). Spread out and place on the crown of the 16" hat. This is representing the hair on his/her head.
Glue raffia in place with thick designer tacky or hot glue whichever is available to you.
Now place glue on the cut edge of the 12" hat and place atop hair and against brim of 16" hat.
Cut triangles out of felt for eyes and nose. Place on crown forming face.
Use a black pipe cleaner for his mouth. Bend pipe cleaner /\/\/\/\/\ so it looks like that. Glue to crown.
Make a bow for neck area (under crown) and glue in place.
I put fall leaves on top of his hat to also give some color.
Note: It can be done actually with any size hat. Just adjust accordingly.
Copyright © 1996 by Sue P. All rights reserved.
Edible Autumn Leaves
Materials:
1 bag each of semisweet chocolate and white chocolate morsels (chips), broad leafed herbs such as mint, basil, celery, etc.
Select your sprigs of leaves in the produce section of your grocery store or from your garden. Wash leaves thoroughly and pat dry. Melt chocolate with 2 tsp. of butter, stirring until smooth. Pour chocolate into small bowls and give each child a clean small paintbrush. Paint the underside of the leaves with the chocolate and place on a wax paper covered cookie sheet. Refrigerate until firm. Slowly pull real leaves away from chocolate leaves. (Explain to children how art is a reflection of the true beauty of Nature.)
. Fall Leaf "Stained Glass"
Items needed:
fall leaves
wax paper
iron
towel
picture frame
Directions:
Collect as many different colored and size fall leaves as possible!
Cut two pieces of wax paper slightly larger than your picture frame.
Lay one piece of the wax paper on the towel, and arrainge the leaves in a pleasing design.
Lay the other piece of wax paper over the leaves, and lay another press the two together using a hot iron and moving quickly but firmly
Tape the "stained glass" to the picture frame and cut off the excess
Hang in a window for best results. 
Wreath of Leaves
You will need:
corrugated cardboard
yarn
poster board
glitter
fabric
newspaper
glue
scissors
Cut a doughnut shape from the cardboard to make a wreath. Wrap yarn completely around it.
Draw and cut out leaves from colored poster board. Working on an old newspaper, spread glue around the edges of the leaves and sprinkle them with glitter. Attach them to the wreath.
Cut a strip of fabric and make a bow for a decoration.
Attach a loop of yarn to the back of the wreath so you can hang it up.
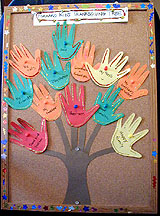 HARVEST HOME HANDPRINT TREE
Submitted by: Amanda Formaro, WebMom at FamilyCorner.com Magazine.
Why not start a new tradition with your children with this fun and simple activity.
To make your own Harvest Home Tree you will need the following materials:
What You Need:
sheet of white poster board
pencil
tempera paint, markers or crayons
construction paper in red, yellow and orange
markers
scissors
glue or tape
glitter glue (optional)
What You Do:
At the top of the posterboard, entitle your tree "Smith Kids Harvest Home Tree", inserting your family surname in the title.
With a pencil on poster board, draw a basic tree with a branch for each child in the family. If you only have 1-2 children, it might be fun to include two or three branches for each child.
Using tempera paint, markers, or crayons color the tree trunk brown. On red, orange, green and yellow construction paper, trace 10 copies of each child's hand. Cut out and give each child their "leaves".
Each child writes one thing that they are thankful for on each leaf (grown ups can help if needed!). You may decorate the leaves with glitter glue if you like. Next, tape or glue the leaves onto their designated branches.
This makes a great activity to keep kids happy during a large family gathering. Hint: Make the base ahead of time for quick start up.
Hang up the Thanksgiving Tree where the whole family can see it. Makes a great conversation piece! Later, after dinner, have the children present their tree to the family gathered around. Each child tells what they are thankful for and why.
For added fun, make additional posterboard bases up ahead of time so that the rest of the family can add their leaves as well. Have supplies at the ready!
Variation:
This project can also be easily adapted to a cork board (see photo) by simply using colored push pins to match the leaves. Use brown construction paper to make the tree trunk. |
|
|
|