|
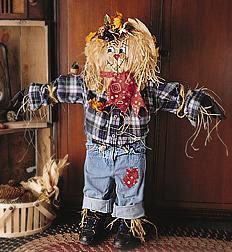
Friendly Scarecrow
Designed By: Debi Schmitz
INSTRUCTIONS:
1. From sheet of STYROFOAM, cut 8" x 17" (body and legs) and 18" x 4" (arms and shoulders) pieces. Cut a triangle measuring 7" long and 3" wide from 8" x 17" piece (see Diagram A).
2. Insert 1/2 of (2) 16-gauge wires into top of body piece as shown in Diagram A. Center and glue the arm piece onto top of body. Roll cuff of pants up 1 1/2" and roll again. Slip jeans onto body.
3. Cut ball in half; glue halves to body of STYROFOAM for scarecrow's bottom. Put shirt on arms; button. Stuff raffia into the stomach area, leaving several pieces sticking out of shirt between button holes.
4. Tuck shirt into jeans, zip jeans and thread 30" of jute or rope through belt loops; tie knot in front.
5. Cut 5 7/8" x 3 7/8" egg of STYROFOAM in half lengthwise. Insert and glue 6" dowel into narrow end of egg half 2" deep; slide glove onto egg with flat side as palm. Insert and glue dowel into arm leaving 1" of dowel between hand and body. Tie knot of raffia to exposed dowel, covering knot with shirt cuff. Tie 12" piece of jute into a knot around wrist over shirt. Repeat for second arm.
6. Flatten one side of (2) 3 13/16" x 2 13/16" eggs; glue flat side into shoes. Insert 7" dowel into each egg; glue to secure. Glue raffia strands into top of shoes; tie shoestrings tightly. Carefully insert and glue dowels into legs of scarecrow. Before glue dries, ensure scarecrow will stand; shoes may need to be pointing away at angle.
7. Insert several 1 1/2" lengths of 16-gauge wire into side of disc. Glue second disc on top of first for head. Insert remaining wire into edge of second disc to secure tightly.
8. Insert 10" dowel halfway into edge of doubled discs; glue other end of dowel into center of arms and body, with head resting on shoulders.
9. Lightly trace face onto bottom half of brown paper square with carbon paper (Diagram B). Paint face as photographed. Draw smile, eye outlines and freckles with permanent marker; let dry. Center face on discs of STYROFOAM and gather around head. Stuff raffia between the paper and discs under the face to give it a rounded look. Tie a 4" x 36" length of bandana fabric around neck to hold paper in place; glue where needed. Cut excess paper to 3" longer than neckerchief.
10. Tie several long strands of raffia together; glue to top or back of head for hair. Repeat as needed. Rough up straw hat by ripping or cutting notches into it; glue securely to head. Make 3" U-pins with 16-gauge wire and insert where needed to secure hat. Fold a front flap over; pin in place.
11. Glue leaves onto hat flap and around side of hat. Glue pick on hat flap and bird on shoulder. Insert leaves into front shirt pocket. Cut out patches of fabric; glue to pants. Use marker to make stitch marks on patches. Stick remaining piece of fabric in back pocket.
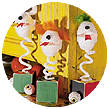
Twisted Paper Witch Materials:
4" length of 3/8"- diameter wooden dowel
1 1/2"- diameter wooden bead with predrilled 3/8" hole (for head)
Twisted-paper: 2 1/2 yds - rust, 2 1/2 yds - natural, 1 yd - black
24" of 26-gauge wire
handful of Spanish moss (for hair)
1 1/4" Styrofoam ball
6" long straw broom
green chenille stick
orange twisted paper
Tools:
glue gun
scissors
pencil
carbon paper
white dressmaker's carbon
Instructions:
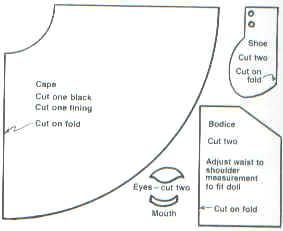
For patterns click here: Overskirt - Collar - Hat Brim
Head and Body
Glue one end of dowel; slip end into hole in wooden bead; allow it to dry. Cut a 10" length of rust twisted-paper ribbon, untwist it and fold it in half crosswise (body). Using tip of scissors, cut a small slit at center of fold; insert free end of dowel through slit until head rests on body. Glue head to body.
Underskirt
Cut seven 8 1/2" lengths of rust twisted-paper ribbon; untwist them. Apply glue to one side of one strip end; attach strip to dowel about 1 1/4" from head; wrap glued end of strip around dowel. Repeat to attach remaining strips, overlapping edges to create a circular base; let dry. After attaching the underskirt strips, trim the bottom before you spread the paper out so that the base will be even and stand up better. Stand witch upright, bending out bottom of underskirt for balance.
Arms and Sleeves
Cut a 7" length of rust twisted-paper ribbon (arm) set aside. Cut two 5" lengths of rust twist, untwist. Roll one 5" piece lengthwise into a loose cylinder; glue along length wise edge (sleeve). Slip sleeve over one end of arm so that twisted end extends 1/4" beyond sleeve (hand). Apply 1/2" wide band of glue 1/4" from end of hand; press lower end of sleeve onto glue to make a 1/2" wide cuff. With your thumbs against cuff, work upper sleeve down over cuff about 1/2", creating a puffed sleeve. Glue top of sleeve to center of arm. Repeat to make and attach other sleeve. Center arms under body next to head; glue arms to dowel. (Side of dowel to which arms are glued will be back.) Fold body over arms; glue body front and back to underskirt.
Overskirt
Cut six 6 1/2" lengths and five 8 1/2" lengths of natural twisted-paper ribbon for overskirt; untwist. Using pencil, carbon paper and full-size pattern, trace outline of short strips onto each 6 1/2" length of twist and outline of long strips onto each 8 1/2" length; cut out strips. Attach long strips to underskirt first, keeping upper ends of strips even: Glue top of each strip; press strip into place below sleeves, overlapping strips around body. Attach short strips in same manner. Starting at back and pulling wire slightly, wrap wire around body six times, 1/4" from top of overskirt. Twist ends of wire together to secure; bend ends flat against back. Bend out some overskirt strips to add fullness to skirt fold back one lengthwise edge on two or three adjoining strips to give skirt windswept look.
Cape
Cut two 12" lengths of black twisted-paper ribbon; untwist. Glue pieces together along one lengthwise side, overlapping edges about 1/4". Evenly trim corners on one short end glue one side of opposite short end; trap this end around back of shoulders; press in place.
Collar
Cut a 4" length of black twisted-paper ribbon; untwist. Using white dressmaker's carbon, trace full size pattern for collar onto the piece. Cut out collar, slitting where indicated. Apply glue around base of neck; slip collar around neck; press in place, overlapping ends at back. Glue ends together.
Hair and Hat
Apply glue around top, back and sides of head. Form a mall nest of Spanish moss and invert it over head; press in place. Cut a 4" piece of black twisted-paper ribbon; untwist and cut to make a 4" square. Fold two adjacent sides of the square toward each other, overlapping edges about 1/2" to form a cone; glue edges together. Trim bottom of cone to make even. Bend bottom out slightly; apply glue along underside; press onto head; twist tip. Cut a 4" length of black twisted paper ribbon; untwist. Using dressmaker's carbon, trace full-size pattern or brim onto the piece of twist; cut out. Cut out center hole; slip brim over top of hat. Glue to base of hat top.
Pumpkin
Poke a hole in each end of the 1 1/4" Styrofoam ball with a pencil or knitting needle. Cut a 2 1/2" length of orange twisted paper. Open the paper and wrap it around the ball with the hole at the top and bottom. Using the knitting needle push the ends of the paper down into the holes on the top and bottom of the ball. Cut a 1 1/2" piece of green chenille stick and curl it around the knitting needle. Remove and glue one end in the top hole of the ball.
Finishing Touches
Bend left arm, glue pumpkin to inside of arm. Glue handle of broom to front of right cuff and bottom of broom to front of skirt.
This great craft project was brought to you as the result of a collaborative effort between Crafter's Community http://crafterscommunity.com and FamilyCorner.com Magazine
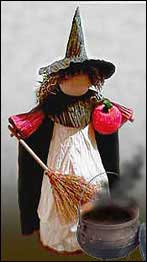
Witch Doll
What you need:
Black rug yarn, black satin fabric, cotton batting, 2 old nylon stockings, crinoline, red and black felt, 2 wire coat hangers, adhesive or masking tape, and 4 small buttons.
What to do:
1. To make the padded coat hanger body, cut crossbar of hanger in half, and straighten wires. Close loop of hook to form head. Cut bar off second hanger and tape to twisted area of first hanger to form arms. Tape two straightened wires of first hanger together 4 inches below arm wire (hip line). Bend end of each wire up 9 inches below tape; bend remaining 4 1/2 inches into oval foot shape. Loop ends of arm wires for hands.
2. Pad hands and feet with cotton batting; wrap with a 2-inch-wide spiral-cut strip of nylon stocking.
3. For the head, cut a 6-inch-wide section from stocking. Wrap wire loop with cotton and slide hose section over it; gather and fasten. Slip a ball of cotton under hose and thread it around to form nose. Stuff extra cotton in head where needed; gather and tie off top edge of stocking. Cut eyes and mouth from felt and glue in place.
4. For the hair, wrap rug yarn around a 4 1/2 x 8 1/2-inch piece of paper to form the loops. Machine-stitch through paper and yarn 4 1/4 inches from the outer edges. Pull the paper off and adjust wig on head; sew in place.
5. Cut shoes following pattern; make adjustments to fit feet. Hand-stitch in place on sole section; side seam, turning under 1/4 inch on raw edge. Add buttons next to seam.
6. For pants, fold 8 1/2 x 8-inch black fabric in half to 8 1/2 x 4-inch-size. On fold line, cut slit 4 inches from bottom for legs. Seam 8 1/2-inch-long raw edges together to 4 inches from lower edge. Match the leg edges and seam. Run gathering stitches around the waist and legs. Put pants on witch and draw up to fit.
7. For the slip, hem a 1 1/2 x 72-inch piece of print fabric. Gather for ruffle, drawing up to 35 1/2-inch length. Join the ruffle to a 7 1/2 x 36-inch piece of printed fabric; hem edges. Run gathering thread on top edge. Slip on doll, gather to fit waist, and secure.
8. From the same print, cut a 24 x 1 1/2-inch piece for apron ruffle and a 4 1/2 x 12-inch piece for skirt. Straps are two 1 1/2 x 2-inch pieces, and the waistband is 3 1/2 x 1 1/2 inches. Hem ruffle and gather to fit skirt edge; stitch in place. Hem sides of apron; gather the top edge to 3 inches. Hem the ends and sides of ties. Join the waistband to the skirt. Add ties.
9. For the hat brim, cut two 4 1/2-inch diameter circles of black fabric and one of crinoline. Place crinoline on wrong side of black circle. Stitch right sides of black fabric together along edge, leaving opening to turn. Turn; handstitch opening closed. For crown, cut a semicircle (4-inch radius) of crinoline and a 4 1/4-inch radius semicircle from black fabric. Turn under raw edge and blindstitch fabric. Overlap edges of crinoline to form cone; baste to hold. Cover the cone with black fabric, turn under raw edge, and blindstitch. Turn 1/2 inch under at base of cone, center on brim, pin, and handstitch. Add ribbon ties.
10. For the cape, cut one printed and one black piece of fabric (see pattern below). With the right sides together, stitch 1/2-inch seam, leaving a section open for turning. Turn and hand-stitch the opening closed. Add ties.
11. For the dress skirt, cut a 7 1/2 x 36-inch piece of black fabric; cut two 5 x 7 1/2-inch pieces for sleeves, and cut bodice according to pattern shown. Hem sleeves along 5-inch measurement; stitch underarm seam. Slide sleeve on arm, gather top, and sew to doll shoulder. Cut two bodice pieces and slit back of one piece on fold line. Hem both sides for back closing. Sew shoulder and underarm seams, leaving armholes. Turn under hem at neck. Hem skirt and join back seam (7 1/2-inch edge). Gather waist edge of skirt to fit waist measurement of bodice; join bodice to skirt. Slip doll into dress, turn under raw edges at armholes, and catch in place around armholes.
|  |
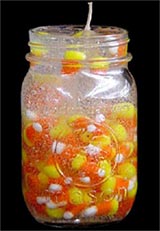
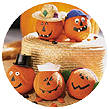
Candy Corn Candles Materials Needed
8 oz. gel candle medium
Small clean mason jar
cup candy corn (Plastic novelty eyeballs or wiggly eyes can also be used for a different look)
Black and Orange Spool-o-ribbon
Instructions
1.Melt candle gel in a large microwaveable dish at 30 second intervals until completely melted.
2.Slowly pour melted wax into mold. Allow to set for 1 minute.
3.Push candy corn or eyeballs into candle using a chopstick or skewer.
4.Refill mold to fill in holes.
5.Tie Black and Orange ribbon around base of candle.
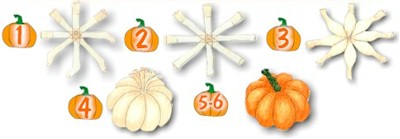
Soft Sculpture Pumpkin
Here is what you need:
Two pairs of old pantyhose
Orange and green poster paint and a paintbrush
Styrofoam tray for drying
Fiberfill
Scissors
Two rubber bands
Stapler
Here is what you do:
(see picture of steps below)
Cut the four legs off the pantyhose. Arrange the legs crossing over each other at the center like spokes of a wheel. Staple the legs together at the point where they all cross over each other.
Cut the toe end off the foot of the pantyhose so that all the legs are open at the ends.
Stuff all sections of pantyhose with fiberfill. Leave about 6 inches at the end of each stocking unstuffed.
Pull the eight sections up and around to the center to form a pumpkin. Hold the sections together with a rubber band.
Braid the excess stocking ends together to make a stem for the pumpkin. Hold the braided stem in place with another rubber band.
Paint the pumpkin orange and the stem green. Let the project dry on the Styrofoam tray. You can turn this pumpkin into a jack-o'-lantern by gluing on a face cut from black felt.
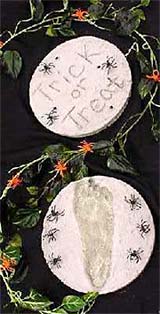
Stepping Stones Materials Needed
Stone Craft Garden Stone making kit
Garden Stone Mold
Old pair of shoes or gloves
Instructions
1.Create garden path stones according to instructions in kit.
2.Create the impression of ghost footprints (or handprints) in the stones by gently pressing old shoes (or gloves) into the stones while still slightly wet. Add other embellishments as desired such as eyeballs or spiders. Allow to dry thoroughly.
Place stones on pathway up to your door for trick or treaters to follow the ghost's path to your door.
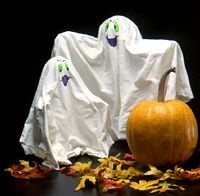
Dip And Drape Ghost Centerpieces A NOTE: I have seen these made withe everything from fabric to cheesecloth and everything from liquid startch to watered down Elmers glue. The moral os the story Dont be afraid to improvise its hard to make these not turn out great.
What You Need:
Add this spooky duo to your home.
12-inch-long plastic foam cone
4-inch-diameter plastic foam ball
Twigs
Masking tape
Plastic wrap
White fabric
Fabric stiffener (available at crafts stores)
Plastic bag
Purple, green, and black fabric or craft pens
Instructions:
Fabric stiffener firms
the shape.
1. Assemble a form for the ghost. Attach the foam ball to the top of the cone with a short straight twig. Use masking tape to fasten several twigs together to make arms, then insert the arms as desired into the sides of the cone. Cover the entire shape with plastic wrap.
2. Cut a piece of white fabric into a square or a circle. Make sure the fabric is large enough to fully cover the form with some extra for draping.
3. Pour 1 cup of fabric stiffener into the plastic bag. Place the fabric piece in the bag. (Photo 1) Squeeze the bag repeatedly to soak the fabric with stiffener. Add more stiffener to the bag, if necessary.
4. Remove the fabric from the bag. Lay it out on a flat surface that's covered with waxed paper. Press it with the heel of your hand to reshape the fabric so it will be easy to drape over the form.
5. Place the fabric over the form. Drape it to shape a ghost. Keep some of the fabric along the base so the ghost will stand by itself when it's removed from the form. Let the fabric dry.
6. Paint on eyes, eyebrows, and a mouth. Remove the ghost from the form. Reuse the form to make more ghosts.
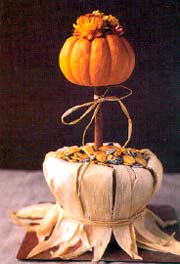
Pumpkin Topiaries Materials:
Sharp knife
1 miniature pumpkin
1 12-inch cinnamon stick (at most craft stores)
Grout
Plastic grocery or sandwich bag
1 4-inch terra-cotta pot
Spoon
Dried corn husks
Scissors
1 bunch dried strawflowers
Wire cutters
Glue gun
Raffia
Sunflower seeds
Roasted Pumpkin Seeds
Directions:
1. With sharp knife, carefully carve a hole in the bottom of your pumpkin. Go slow, mini pumpkins are tough and dense. Make hole just large enough to fit the end of the cinnamon stick. After it fits, remove cinnamon stick and set it aside.
2. Mix grout according to manufacturer directions, but use a little less water than called for. It's easier to work with a thicker mix and less drying time is needed.
3. Cut a small piece of plastic from grocery or sandwich bag - place it in the base of terra-cotta pot to cover the drainage hole. Using a spoon, fill 1/4 of the pot with grout.
4. Place the end of a dried corn husk into the grout along the inner wall of the pot; repeat with remaining husks to circle inside of pot. Carefully spoon more grout into the pot, filling it half full. If grout spills onto exposed corn husks, wipe it off with a damp cloth.
5. Place cinnamon stick in the center of the grout; stick should touch the bottom of the pot, but not break through or move the plastic covering of the drainage hole. If needed, prop cinnamon stick in place with an open pair of scissors (lay scissors over the pot with cinnamon stick resting in scissor's opening). Let grout dry completely.
6. Remove the stems from the dried strawflowers with wire cutters. Using the glue gun, glue flowers to the stem of the pumpkin. Remove and dried strings of glue.
7. Place the pumpkin on the cinnamon stick, fitting it into the hole carved in the bottom of the pumpkin. Smooth corn husks down over the outer wall of the pot and tie securely with raffia. With more raffia, tie a bow or knot around the cinnamon stick.
8. Fill pot with sunflower seeds and Roasted Pumpkin Seeds.
Wendy Sloneker, Safeway Select Magazine, Sunset Publishing
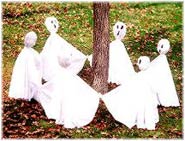
Ghost Host Summon up the Halloween spirit with this spectral sextet.
Materials
6 dowels
Small white garbage bags
Newspaper
Masking tape
Old white sheets
String
Black permanent markers
Step 1: First, find a good location for your gathering of ghosts. They look especially good when circling a central pole, such as a tree or lamppost.
Step 2: Next, cut your dowels to the height you'd like your ghosts to be. We've seen them in every size, from toddler height (quite cute) to larger than life (quite spooky). Remember: the larger the ghosts, the more sheets you'll need to use. The ghosts shown here are about 4 feet high.
Step 3: To make a ghost head, stuff a small white garbage or paper bag with crumpled newspaper or leaves to the size you like. Push one of the dowels into the bag, then wrap masking tape around the neck to secure. Repeat for the rest of the ghosts.
Step 4: Drape a sheet (or half a sheet, if you're making small ghosts) over each head and tie a piece of string around each neck. You may need to experiment with cutting your sheets to the right size; here, we used a queen-size sheet for each ghost and rounded the bottom edges to the desired length.
Step 5: Use permanent black markers to draw a face on each ghost.
Step 6: Gather your ghosts around the tree or polewith a foot or two between each oneand push the dowels into the earth so that the sheets touch the ground. Angle the ghosts so that they are leaning slightly backward, then knot the corners of the sheets together as if the ghosts were holding hands.
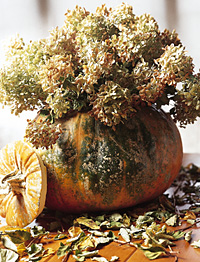
Fall Floral Centerpiece A cloud of hydrangea makes a beautiful presentation for the fall table when tucked into the top of a pumpkin. This natural centerpiece is ideal for grown-up Halloween festivities or any fall get-together.
What You Need:
Medium or large pumpkin
Sharp knife
Spoon
Fresh-cut or artificial hydrangea
Scissors
Instructions:
1. Cut a circle around the pumpkin stem. Scoop out the pumpkin using a spoon.
2. Cut the hydrangea stems. Use scissors to trim stems to an appropriate length to place inside the pumpkin. If using fresh-cut flowers, place a plastic liner in the pumpkin before arranging the flowers.
More Ideas:
Use miniature pumpkins and one sprig of hydrangea to make trims for individual place settings.
Fill the pumpkin with cattails, a mound of large pinecones, or interesting twigs.
| |
For The Kids 
Our Friendly Ghost by Amanda Formaro
http://www.thefamilycorner.com
This lovable little ghost can't wait to greet trick-or-treaters. A whimsical addition to your Halloween decor, she's wearing her best bow and perching patiently in her rustic wooden basket. Her body is fashioned from easy to use loopy chenille, which gives her an appealing, cuddly softness.
You will need:
4" diameter Styrofoam egg (for head)
4" x 9" Styrofoam cone (for body)
Floral pins, T-pins
8 yards white jumbo loopy chenille
32-gauge white tie wire
Two 9"-long black chenille stems
16 quart shallow wooden basket with wire handles
1 1/4 yards of 3/4" wide black French ribbon
Two 8-leaf stems of fabric autumn leaves
3/4 yd of 1 3/4" or 2" wide autumn print fabric ribbon
2/3 yd of 3/4" wide black satin ribbon
3/4 yd of 1 3/4" or 2" wide orange-green sheer ombre ribbon
Rubber spider
Tools:
low temperature glue gun
ruler
scissors
Note: be sure to use a low temperature glue gun and not a hot glue gun.
Head & Body
With small end of Styrofoam egg (head) pointing up, glue egg to top of Styrofoam cone (body), then secure with floral pins.
Cut four 1-yd pieces of white jumbo loopy chenille. Fold each piece into thirds with one end tucked inside the fold; glue folded sections of each piece together. Glue, then pin open end of each folded piece to body 4" from bottom, covering sides and front of body with chenille to form skirt.
Cut four 24" long pieces of loop chenille. Fold each piece in half. Starting with fold of each piece at center top of head, glue two pieces down center front of head and body until pieces meet top of skirt. Repeat with remaining two pieces, glue one piece to each side of first two pieces. Curl ends of loopy chenille to one side where they overlap skirt. Cut one 4" long piece of loopy chenille. Starting at one side of head and working across back to other side, glue 4" long piece of loopy chenille to top of head just in back of first four pieces. Tie a piece of white tie wire around neck to define and hold shape of head.
The Arms
Cut two 24" long pieces of loopy chenille. Fold each piece into thirds with one end tucked inside fold; glue folded sections of each piece together to make an arm. Glue, then pin an arm to each side of body just below head. Bend arms (photo).
The Eyes
Tightly coil one black chenille stem; shape it into an oval. Repeat with second black chenille stem. Glue coiled stems to front of head for eyes.
The Wall Hanging
Place basket on its side (this will be bottom of wall hanging) so that handles are at same height. Glue bottom of cone to inside center of basket; let loopy chenille skirt hang over basket (photo). Make a bow with black French ribbon. Glue bow to neck of ghost.
Decorating the Basket
Glue one stem of leaves to inside of basket behind ghost. Cut two 3-leaf sprigs from second stem of leaves. Glue sprigs to inside bottom of basket on each side of ghost. Glue remaining two leaves to left side of basket about 5" above handle.
Make a 4-loop bow with autumn print ribbon, securing loops with white tie wire. Add two tails of 3/4" wide black satin ribbon to print bow; knot ends of tails. Make a 4-loop bow with ombre ribbon, securing loops with white tie wire; attach ombre bow with wire to top of print bow at center. Glue completed bow to right side of basket on top of leaves.
Glue spider to leaves at top left side of basket.
Copyright 1999-2000, Amanda Formaro.
WOBBLIN' GOBLINS For each one: : 2 white plastic-foam egg cups, each with attached back of lid
White 12" chenille stem
One 5/8" wiggly eye
2" square block of wood
Scrap of red foam crafts sheet (Fun Foam) or felt
Acrylic paints (Ceramcoat Poppy Orange, Jubilee Green, Opaque Yellow, Black)
Scraps of wool or batting for hair
Tacky glue; pinking shears; scissors; sandpaper; staple gun
PAINT: sides of wood block different colors. Let dry. Sand edges.
CUT: across front edge of egg cups with pinking shears for teeth.
POKE: a hole in bottom of one egg cup. Insert chenille stem from below and form a small curl inside to hold in place.
GLUE: flat backs of cups together overlapped. Cut 2"-long red foam forked tongue; glue end to back between teeth. Glue eye to front, hair to head.
WIND: stem around 4 pencils (bunched together) or a broomstick to curl it. Remove. Staple curved end to center top of wood block.
Halloween Window Watchers You need:
Craft Foam: 1 Sheet each of Orange, Green, Black, White, Purple
Tacky Glue
Eight 1" Suction Cups
Stapler
Scissors
Black and White Enamel Paint & Paint Brush (Optional)
Instructions:
Suction cup eyes will stand out more if you paint the backs with enamel paint. Do not paint the flat part of the back where glue will be applied. Dry thoroughly
Make patterns for bat, pumpkin, skull, and Frankenstein. Staple patterns to craft foam at edges. Do not staple inside the areas you will be using. Cut out pieces, assemble and glue. Glue suction cups in place. Stick them on window to watch for trick-or-treaters
Hot Glue Spider Webs Materials:
Glue gun and glue sticks
Waxed paper
White embroidery floss
Pencil and paper
Optional: silver or white glitter
Instructions:
Draw several spider webs on the paper, place the waxed paper over the drawings and with your glue gun trace all the lines being sure that they meet and crossover at the intersections to give your web strength. Allow to cool completely and peel the web from the waxed paper. These spider webs can be hung using a soft thread like one strand of embroidery floss tied around the thickest point of the outer edge of your web.
Option: Sprinkle with glitter while the glue is still hot and tacky.
TENNIS BALL GANG Old tennis balls
Acrylic paints (FolkArt White, Black, Glazed Carrots)
3/4" stiff paintbrush for ball; fine brush for details
2 pompoms and scrap felt for earmuffs
Assorted small hats; tacky glue or glue gun
PAINT: ball white. When dry, paint orange. Let dry.
PAINT: simple funny faces with black and white paint. Let dry.
GLUE: on hat. For earmuffs, glue felt strip across top and a pompom on each side.
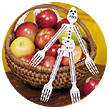
PLASTISPOOKS For each one: white plastic spoon; 4 forks
Black fine-point permanent marker or Apple Barrel Indoor/Outdoor Acrylic Enamel and small paintbrush
White chenille stem or pipe cleaner
White foam crafts sheet (Fun Foam) or 2 layers felt glued together
Spring-clip clothespins; scissors; glue gun
DRAW: face on back of spoon bowl and dots along handle for spine with marker or paint, following photo. Draw long lines for bones on front of fork handles and dots for short bones on tines.
CUT: ovals for shoulders and hips from foam or felt. Center across top and bottom on back of spoon handle; glue and clamp with clothespin until dry.
GLUE: arms to shoulders and legs to hips at front; clamp.
WIND: chenille loosely around spine for rib cage; glue ends to back of shoulders and hips.
|