|
Welcome Back! I was just outside enjoying my gardens. Ive greatly expanded my herb garden this year and am happy to report its flourishing. However this presented me with the garden topic for this month, now that Ive grown them, what do I do with all these herbs? This months column will discuss how to preserve all of the fabulous herbs we've grown. Blessings Hazel 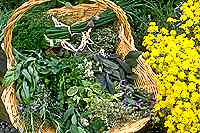
Harvesting & Preserving Herbs
by Ann McCormick
A Gardener's Reward
Gardening is hard work, there's no denying. First you find a plot to
garden that has enough sun and not too many obstructions. Then you
tear out the weeds and dig the soil in preparation for the tender
plants. Along the way you discover rocks hidden just under the
surface that, like the icebergs that sunk the Titanic, looked small
and insignificant before you began. After much sweat (and an
occasional skinned knuckle), you plant your herbs and faithfully
water and weed them, week after week. Finally, the blessed day
arrives when they can be harvested.
When to Harvest
Most herbs can be snipped for the small amounts needed for cooking
almost as soon as they grow larger than a few inches. However a major
cutting to harvest the herb is best done when the plant is mature
enough to withstand the stress (in the case of perennials) or fully-
developed and at its peak (in the case of annuals). There are two
considerations in deciding when to harvest; time of day and time of
year.
Determining the optimal time of day to harvest herbs is fairly
simple. The best time is mid-morning, after any dew has evaporated
from the leaves. This is also the optimal time to harvest herbs to
maximize the essential oil content that provide the flavor we crave.
Since most herbs are preserved through drying, the trick is to
minimize the amount of water on the plant material you are
harvesting. Ideally, the plant leaves should be dry to the touch.
Wait at least a full day after rain (or use of sprinklers) to insure
a dry plant surface. If necessary, spray them with a hose the day
before harvesting to remove dirt or stray insects.
The time of year that a herb should be harvested can vary
tremendously. It depends heavily on the herb's growth pattern (e.g.
annual versus perennial) combined with the growing region in which
you live. For example, in Southern California where the climate is
classified as "Mediterranean", many herbs can be harvested several
times throughout the year, even as late as Thanksgiving. However, the
same herb growing in a Canadian garden may have just barely enough
time to reach maturity before the Arctic winds shut down all growth.
Here are a few hints to help you decide when to harvest.
Root Crops - Herbs such as garlic, ginger, and galangal are best
harvested in the fall when the leaves start to yellow and the plant
is preparing for a dormant period.
Annual and Biennial Herbs - Basil, summer savory, parsley, and other
annual or biennial herbs grown for their leaves can usually be
harvested periodically during the growing season. In fact, basil
benefits from regular harvesting, which will prevent it from going to
seed and completing its life cycle. Those of you in colder climates
should also remember that your shorter growing season and harsher
winters make it necessary to treat some true perennials as if they
were annuals.
Flowering Herbs - Edible flowers from herbs such as roses, lavender,
borage, and pot marigold are best harvested when the flower has just
opened. The flower petals, ovary, and calyx are all firm and at their
maximum freshness at this point.
Seed Herbs - Herbs that produce seeds require the most precise
timing for harvest. You must wait until the seeds are fully ripe,
since no further ripening or improvement in flavor will take place
after the seedhead is separated from the plant. Once maturity is
reached, harvest immediately to maximize the amount of the seeds you
capture. Delaying even a few days can result in loss of the seed crop
to hungry birds or scattering of the seeds due to high winds or other
weather conditions.
Perennial Leaf Herbs - Perennial herbs are the easiest to harvest.
In general, you can harvest any time during the growing season when
enough plant material is available. My only caution is to avoid
harvesting in late fall. Late harvesting can stimulate growth of
tender shoots that will not have time to harden before winter hits.
It can also deprive the plant of its natural buffer zone against
drying winter winds that cause "die back" and sometimes the death of
the plant.
|
|
|  |
|
|
|
|
Harvesting Techniques
The technique used to harvest the herb depends on what part of the
plant is required. Here are some examples from the more common herbs.
In all cases, if you are harvesting more than a handful, have a dry,
clean container (basket, bucket, paper bag) for the cut branches.
Once they are cut you need to treat them as you would food, keeping
them away from dirt and contaminates.
Chives - Cut chive leaves to within about an inch of the ground.
Since the heart of the plant is in the underground bulb, they can
withstand this extreme cut.
Basil, Mint, and Other Square-Stemmed Herbs - Cut branches down to a
node where there are leaves or side shoots. This will encourage
existing shoots or dormant growth buds to branch out, resulting in a
bushier plant. Leave at least six inches (15 cm) of the plant so that
it will still have enough leaves to produce food.
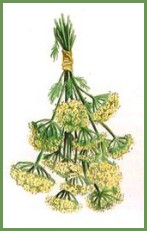
Dill, Caraway, and Other Seed Herbs - Have a large paper bag ready
to receive the ripe seedheads. Cut the stem below the seedhead and
place it immediately in the bag. Since ripe seeds easily fall from
the seedhead, be sure to minimize handling prior to securing the
seedhead in a container.
Sage, Thyme, and Other Woody-Stemmed Herbs - Perennials that develop
woody stems after the second year are best cut down to portions of
the woody stems. You may find that harvesting is a good time to shape
the plant to your liking by severely cutting back rogue branches.
Lavender and Other Flower-Producing Herbs - When the flower head is
what you are harvesting, cut the flower stem as far down as is
appropriate for the plant. For lavender, cut down to where the leaves
begin. For roses, cut the stem back to where there is a five-leaf
branch or where the stem is at least the thickness of a pencil,
whichever comes last.
Drying Methods
Now we come to the most difficult part of preserving our herbal
harvest. In drying herbs, we have two dangers to avoid. First we must
not dry them so fast through high temperatures that the essential
oils are driven out along with the moisture. Second we do not want to
dry them so slowly or with inadequate air circulation so that molds
and fungus destroy our crop. With those caveats, here are some drying
methods that have proved successful for myself and other herb
harvesters.
Hanging Bunches - This is the "traditional" method that looks pretty
and can often be seen in glossy photos of Early American kitchens.
Personally, I think it is much overrated. First, you must tightly tie
your bunches or twigs together. While drying, the stems will shrink
and can drop from the bunch if it is too loose. Second, close
bunching of some high-moisture herbs, such as basil, can result in
uneven drying and even mold in the inner core of the bunch. Third,
you have to be careful to find a relative dust-free area (this is
food, after all), with good circulations, and warm temperatures for
this to work well. This almost requires the dedication of a room to
the process. Nevertheless, this method does generally work.
Screen Drying - This method is a step from the hanging bunch,
although it requires more "real estate" in your home. Take an old
window or door screen and place it horizontally on a support with
several inches of clearance underneath to allow for air circulation.
Place the herbs on the screen in a single layer. If you must double
up your herbs due to space considerations (as I sometimes do) be
prepared to stir or rotate them at least once a day to avoid rotting.
As with the hanging method, try to place this in a relative dust-free
area , with good circulations, and warm temperatures.
Using the Oven - This is the "speed dry" method that was very
popular before the advent of microwaves. One method is to place the
herbs on the oven racks, turn on the oven light, leave the door ajar,
and let the heat from the light dry the herbs. This is asking a lot,
in my opinion, of a 40 watt light bulb. The second method is to turn
on the oven to its lowest setting for five minutes to heat the oven.
After turning off the oven, place the herbs on the oven racks and
close the door, leaving the herbs there for several hours or until
the oven chamber returns to room temperature. Repeat the process, as
needed. Avoid keeping the oven on while the herbs are in the oven as
this is likely to drive out too much of the essential oils from the
leaves.
Microwave Oven - Using the microwave is fast, but risky. You must
remember that all microwave ovens do not uniformly heat the contents
of the oven chamber. There are always "hot spots" and "cool spots".
In the microwave I have sometimes had part of my herbs slightly burnt
while other parts were not yet dry. You can only effectively dry
small amounts at a time. To microwave, first remove the stems of the
herb from the leaves, if this can be conveniently done. Then place a
handful of herbs on a paper towel in the microwave. Microwave on high
for one to two minutes at a time, depending on the wattage of your
oven and the thickness of the herbs. In between microwaving, stir the
herbs around on the towel and allow any excess moisture to escape
from the oven. With a little experimentation, this process will work
fine for small quantities.
Paper Bag - This is one of my favorite methods to dry moderate
amounts of herbs. Take a clean paper grocery bag and place the herbs
in it, tips down. Do not pack the bag with herbs because you want to
allow for air circulation. Place in a warm, dry spot. Stir the herbs
daily until the leaves are dry and will break off easily from the
stem. This method is especially good for herbs with small leaves
(e.g. thyme, rosemary) or seeds because they won't fall to the ground
as they would with a screen or by hanging.
Home Dehydrator - If you are fortunate enough to have a home
dehydrator then, by all means, use it for your herbs. It is
specifically designed to remove moisture from fruits and vegetables
so it will have no trouble with herbs. Be sure to follow the
manufacturer's directions for optimal results.
|
| |
|
|
|
|
|
