|
Welcome Back! The summer is here in full swing in my neighborhood. I cant wait to celebrate Litha. This month We've pulled out a few of our favorite Summer Crafts. Enjoy! 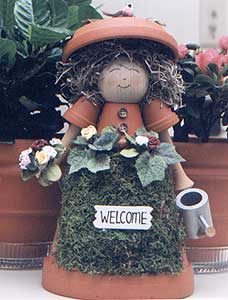
Mrs. Gardener
This fun clay pot project will dress up any garden. Make her large or small.
Materials:
4 Clay pots (choice of size - 1 large, 1 medium and 2 small)
1 Clay pot saucer
Spanish Moss
Sheet Moss
Miscellaneous Floral Embellishments
Small Wooden Welcome Sign
Wood or metal watering can
2 Wood Pegs or similar pieces for arms.
1 wood ball for face
Household or Crafter's Goop Glue (E6000 or other silicone based glue)
Hot glue
2 buttons
String, jute or other small rope
Instructions:
You will need the photo to complete this project. Refer to the photo often for placement.
Begin by gluing (Household Goop) your medium pot to the large pot. Glue the medium pot, centre on the bottom of the large pot. Place a strand of string across the bottom of the medium pot (centred), allowing enough excess string to fit through the small clay pots with a few inches more (this will help to support the arms). Glue on top of the string, the wood ball and allow the glue to dry completely before handling.
Feed the string on one side through one small clay pot and hot glue the clay pot in place on the medium clay pot. Repeat this for the second arm. The help secure the arms (should the hot glue release from the clay), hot glue the wooden spindle to the inside of the small clay pot, making sure the string is glued to both the wood piece and the clay pot at the inside bottom of the small clay pot.
Referring to the photo, cut a piece of sheet moss to form her apron. This piece of moss will extend up and over the bottom of the large pot, but not touch the medium pot. Hot glue the sheet moss in place, making sure you apply plently of glue to the back area of the sheet moss.
Hot glue a little spanish moss the top of the wooden ball for hair. Also glue a little spanish moss to the inside of the clay saucer centre (this helps the hat to sit a little higher and not cover her face).
Hot Glue a little sheet moss to the bottom centre of the clay pot saucer (top of hat) and glue a few little embellishments to the top of her hat. I used tiny birds and branches for this.
Hot glue a few florals to her waist area. Glue a watering can to the large clay pot and to the end of her arm. I used a wood watering can and simply painted it with a metallic silver and gold paint. If you use a wood watering can and plan on keeping her outside, it's a good idea to drill a small hole in the bottom of the watering can to allow any water to escape (your can will eventually rot away if water is left sitting inside for a long period of time)
Tie a small bouguet of flowers together and glue the bouquet to the large clay pot and wrap a tie around her hand to help keep the bouquet from falling. Glue 2 buttons to the front of her dress.
Hot glue the hat to her head, allowing the hat to fall backward slightly. Use lots of glue for this, you don't want her hat to fall off.
To paint her face, you can use markers, pencils, paint or any similar item. I used oil pencil crayons and simply drew lines to create her eyes and mouth. Her nose is a little "U" shape and little red is added for her cheeks. You don't need a face painted, but she looks much prettier with a face.
The little Welcome sign is simply painted white, with a black painted welcome. For any painted parts, be sure to apply varnish or polyurethane to protect against moisture. Simply hot glue your welcome sign to the front centre of her apron, give the sheet moss a little spray of water and you are all done. Midsummer Wreath
This is a good summer project. It makes beautiful wreaths and great gifts! And here's some advice: even if you don't succeed the first time, keep trying and you'll get it.
This project is rated DIFFICULT to do.
What You Need
Bundle of reeds, 1 inch thick and 2 feet long.
Roasting pan
Paper towels
Twine
Scissors
Piece of ribbon 5 feet long
Dried flowers
Extra ribbon for bows
Reeds are available in craft stores and basket supply stores.
How To Make It
Soak the reeds in a roasting pan of warm water until they're flexible, about 15 minutes.
Dry the excess water from the reeds, and then bend them into a circle, overlapping the ends.
Have a partner help you tie the reeds together with twine. Tie tight double knots, and then cut off the extra twine.
Let the reeds dry for about 15 minutes, and then tie the one end of the 5 foot ribbon around the wreath.
Wrap the ribbon loosely around the wreath. Leave gaps so that the reeds show through.
Cut the flower stems to three inches. Weave the flowers into the wreath or tie them on with ribbon. Add ribbon bows and you're finished!
------------------------------------------------------------
This project was contributed by:
Callie Michelle White, 9/14/96 Garden Angel Wreath
By: Alexandra Bleicher
Finished size: 12
Skill level: beginner
Crafting time: one hour, excluding drying time
Whether hung on a wall, in a window or on a door, this flowery angel will add a touch of the outdoors to your home. Her body id made from a clay pot and her arms and legs from wood or cinnamon sticks. Coordinate her with your décor by changing the colors of silk flowers and ribbon used. Cost of this project is under $10.00.
Materials
· 10 straw wreath
· Light to dark green variegated wire edge ribbon, 1 ½ wide, 8 length
· 3 1/2 diameter clay pot
· *Wood Pieces: 3/8 button, two; 1 ½ split flower pot, two; 2 ball
· Cinnamon sticks of twigs: 2 ½ long, two; 2 long, two
· Silk flowers: 3 peach rose; 2 peach rose; rose buds, eleven
· *Acrylic paint: Light Orange, Deep Sage, Deep Peach, Dusty Mauve, White and Ivory
· Light green satin ribbon, ¼ wide x 7 length
· Black fine tip permanent marker.
*Laras Crafts ® wood pieces and Aleenes Premium-Coat Acrylics by Duncan Enterprises ® were used for this project.
Supplies: Paintbrush, paper plate, paper towel, and toothpick, glue gun and glue sticks.
Instructions
1. Pour small amounts of paints onto paper plate as needed. (Note to dry brush dip paintbrush into paint, dab onto paper towel until most of the paint is removed.) Paint rim of clay pot, buttons and ball light orange. Let dry. Paint hair (use picture as guide) and split pots deep peach. Let dry. Dry brush cheeks with dusty mauve. Using Picture as guide draw face on wooden ball with black marker. With toothpick and white paint dot each eye. Let dry.
2. Using back of paintbrush paint flowers on clay pot. Paint as follows: flower centers, dusty mauve, petals, ivory and leaves deep sage. Let dry.
3. Assemble angel. (Use picture as guide) Glue bottom of one peach rose to bottom of clay pot. Glue head to rose and glue second sore upside down on head. Glue one end of 2 ½ sticks to wide parts of split pots, and glue other ends into front of clay pot. Glue remaining to sticks to front of clay pot for arms. Glue buttons to bottom of sticks for hands. Tie light green ribbon into bow and glue to neckline. Glue one rose bud to left hand.
4. Make a wreath bow from wire edge ribbon with three 3 and two 2 loops on each side and a 1 loop in center. Glue to center top of wreath. Attach five rose buds one each side of wreath by dipping ends of rose buds into glue and poking them into wreath.
5. Glue angel into center bottom wreath.
Copyright 2000 Alexandra Bleicher
|