|
CORNHUSK DOLLS 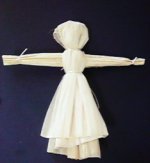
-Corn husks, fresh or dried, about 6-8 pieces.
-String
-Cotton balls, about 4
-Scraps of cloth, yarn, beads
-pipe cleaners (optional)
Note: If you are using dried husks, soak them in water to soften them. Fresh husks need no special preparation
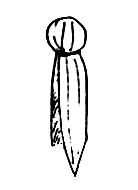
Step 1: Take a strip of husk and place a few cotton balls in the middle, twisting and tying it with string to make a head. 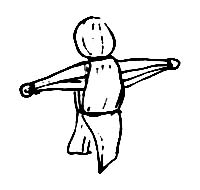
Step 2: Make some arms by folding another husk and tying it near each end to make hands. Slip the arms between the husks that extend under the head. Tie the waist with string.Arrange enough husks around the figure's waist so that they overlap slightly. Tie them in place with string. 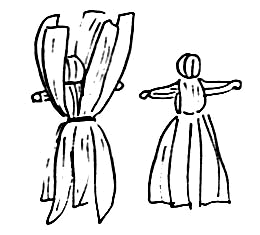
Step 3: Fold the husks down carefully. For a woman wearing a long skirt, cut the husks straight across at the hem. to make a man, divide the skirt in two and tie each half at the ankles. Let the figure dry completely 
Step 4: You can leave you figure as is, or give it a face, hair, or even some fancier clothes. Use a fine-tipped marker to draw facial features. Glue some fuzzy yarn on for hair. Add some tiny beads for buttons, and bits of fabric for aprons or vests. A pipe cleaner staff or cane will help the man stand upright.
Make a Corn Wheel 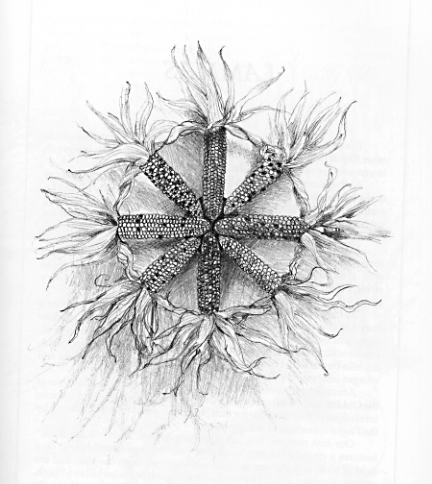
Lammas is the time of the first harvest, and grains, especially corn, are abundant. The eight ears of corn on this wreath represent the eight sabbats. The shucks look like the rays of the sun, a very fitting symbol of the season.
You will need:
a round wire or other hoop on which to build the wreath
8 ears of corn of equal length -- dried or fresh
cardboard
a short piece of ribbon or twine (for hanger)
glue
florists wire (optional)
Fashion a round hoop wide enough to accommodate the length of two ears of corn.
Using ribbon or twine, form a loop to serve as a hanger. Tie or glue this securely to the hoop.
Position the eight ears of corn inside the circle, paying close attention to the illustration. Be sure to keep the hanger/ribbon positioned at the top of the wreath.
Tie or wrap the corn shucks around the hoop. (They can be held in place with florists wire, if need be.) Use stray ends of the shucks to cover the hoop completely. (If using dried corn, the shucks should have been soaked in water before starting.) Use florists wire to keep the shucks in place.
Cut a small, round piece of cardboard. Lay the wreath on the table and position the cardboard circle in the middle of the hoop. Using a glue gun or some other fast drying glue, adhere the tips of the ears to the cardboard circle on the BACK SIDE of the wreath, being careful that the cardboard is not obvious from the front. You may want to cut out the middle of the cardboard circle so it can not easily be seen from the front.
Allow the glue to dry and hang.
|
|  |
|
Make a Garlic Braid 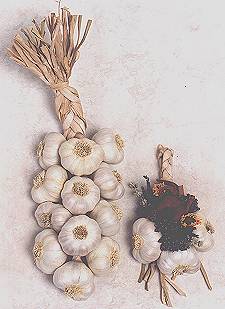 Materials Needed:
At least 12 garlic bulbs with the tops still attached. (Onions also braid well.)
Baling twine or soft jute parcel post string, cut into a 4 to 6 foot length
Scissors
Lammas herbs for decoration (optional)
If desired, chant a rhyme while braiding to empower the braid for protection. Make this ritual as simple or as complex as you care to.
Procedure:
Start with three of your twelve garlic bulbs.
Use one end of twine to securely tie together the stems.
Begin braiding the stems as you would hair for pigtails, working the twine as a unit with one of the stems.
After making several crosses, begin adding additional garlic bulbs, taking care to space them evenly. (You'll be combining several stems into one section of the braid; no one stem will extend for the entire length of the braid.)
Use the twine to make a loop at the end of the braid (for hanging).
Hang the braid in an airy, dry, shaded, place for two weeks.
At the end of this period, check to see if the tops are completely dry. If not, allow them to hang there longer (until the tops are completely dry).
Variation: If desired, either weave in or glue on dried flowers -- particulary those sacred to Lammas:
goldenrod, peony, nasturtium, clover blossom, yarrow, heliotrope, boneset, vervain, Queen Anne's lace, myrtle, rose, sunflower, poppy, milkweed, mushroom, wheat, corn, rye, oat, barley, rice, basil, mint, meadowsweet, apple leaf, raspberry leaf, strawberry leaf, bilberry leaf, blueberry leaf, mugwort, hops, holly, comfrey, marigold, grape vine, ivy.
Note: As stated above, the braids must be allowed to dry for at least two weeks before giving or displaying.
Seed and Corn Necklaces
Materials
Dried beans (several different kinds and colors)
Dried corn which has already been removed from the cob
Dried corn on the cob ("Indian" corn)
1 yard heavy thread or dental floss for each child
1 tapestry needle for each child
finger bandages (just in case somebody gets stuck!)
Prepare the strings in advance by threading the needles and knotting the end. Prepare the beans and dried corn by soaking overnight in water.
Show the children the ear of dried corn (Not the corn you soaked!) and show them how the kernels can be removed from the cob. (Twist the cob firmly in your hands while holding it over a towel or blanket. The corn should pop off--once you get it started it isn't difficult to remove all the kernels.)
Show the children how to use the needle to poke a hole through the center of each corn kernel and bean. Alternate corn and beans or make some other pattern.
When the strand of strung seeds is about 24" long, set it aside overnight or hang it in the sun to dry (the seeds will shrink slightly). When it is dry, push together the seeds to cover any spaces which may have formed.
Tie the ends together in an overhand knot and cut off excess string. Slip the necklace over your head or wind it around your wrist as a bracelet.
|
| |
|
For The Kids 
Acorn Wreath
Parental supervision is recommended.
This project is rated AVERAGE to do.
What You Need
Acorns
Wicker wreath
Hot glue gun
Glue sticks
Newspaper
Flowers or other decoration
How To Make It
First, spread the newspaper on a flat surface. Lay your wreath down flat. Heat your glue gun.
Next, starting in the middle of the wreath begin gluing the bottom of the acorn. Place the glued part of the acorn in the middle of the wreath and stand the acorn straight up. Make 1 row in a straight line going all the way around the wreath. Repeat the process from top to bottom with the wreath still laying flat.
Then decorate with flowers, bows, or even holiday ornaments. Be sure not to leave any open spaces except in the back. The back of the wreath shouldn't have any acorns on it so when you lay it down it is flat.
This project was contributed by:
Sabrina Dameron, Corn Collage
This project is rated EASY
This project was contributed by:
Madene WalkerWhat
You Need
Scissors
Glue
Popcorn kernels
Popped popcorn
Yellow and green construction paper or printed pattern and crayons to color it
Step 1 - Make the Corn Picture
Cut out a corn cob shape from yellow construction paper and cut out some leaves from green construction paper. You might find it easiest to cut out the corn cob, then lay it on the green paper, then draw the leaves, then cut them out. You can glue the finished shape to thin cardboard if you want to make it sturdier.
Step 2 - Attach the corn
Put glue all over the corn cob section, the glue unpopped or popped corn (or both) to the cob.
You're Done!
Let the glue dry, then enjoy your decoration. Be sure to hang it up inside, where it won't get wet!
Indian Corn Mosaics
These colorful corn mosaics will add a bright touch to your house! You'll need to buy a jar of colored popcorn kernels. Draw a seasonal design on a piece of construction paper. Then glue the colorful kernels onto the design. Allow to dry and then hang!
Pressed Flowers This project is rated EASY to do.
What You Need
Refrigerator
Microwave
Two out-dated telephone books
Two heavy stoneware plates
Paper towels
How To Make It
-Cut flowers.
-Place them gently into an old telephone book and place in refrigerator for two days.
-Turn one stone plate face down and place paper towels in bottom center.
-Gently place flowers in a single position, not touching each other.
-Put another layer of paper towels over the flowers.
-Put the other stoneware plate on top of the paper towels matching bottoms.
-Place the plates in the microwave and cook them for 8 minutes on LOW heat.
-Remove them from the microwave and let them cool thoroughly.
-When they are cool, remove them from the paper towels.
-If you aren't ready to use them, put them into another old telephone book and put a weight on it until you are ready to use the flowers.
This project was contributed by:
Madene Walker, 12/21/96to do.
|
|
|
|