|

Apple Roses
Ingredients:
1 tbsp salt
15 oz lemon juice
Golden Delicious apples
waxed paper
floral wire and floral tape
Directions:
1. Mix one tbsp salt and 15 oz lemon juice until dissolved.
2. Slice one golden delicious apple (1 per rose) vertically into 1/8" slices, leaving the ring of skin intact.
3.Immediately soak the apple slices in the lemon juice mixture for 5 minutes to keep from browning.
4.Spread slices in a single layer on waxed paper. Air-dry for at least 24 hours, slices will curl.
5.Bend a small loop at the end of a wire stem. Twist a small slice snugly around loopto form center. Using thin wire, secure additional petals into a rose.
6. To make calyx, take a 2 inch piece of floral tape and twist one end to form a point. Make three for each rose. Hold at the base of the rose. Bind base of rose and entire stem with floral tape.
Project by Lorrie Keller
How to Make a Grapevine Wreath
Heres a great idea for recycling your grapevine trimmings. Making a grapevine wreath is very simple. First, take a fresh vine and form a circle in the diameter you want the wreath to be. Most likely, you will have excess vine; wind this excess vine around the vine circle you just
formed. When the vine is to the end, tuck that end firmly inside a space between two wound vines; on the first round, there might not be two wound vines to tuck the end into, so just hold the end of the vine until it is wrapped in with the second vine. Now take another vine, insert the beginning end between two wound vines and begin the winding and ending process all over again. Keep doing this until you have a wreath in the thickness you desire. Keep in mind that the wreath will shrink as it dries, so you will want to make it a little thicker than your desired thickness.
When you have finished assembling your wreath, you can lay it in the sun to dry for a couple weeks, or bring it in the house and hang it to dry.
These wreaths make fine gifts to give to friends and family as is or fixed up with dried flowers and herbs and ribbons. If you dont grow your own grapevine, maybe you have a friend or neighbor whod be happy to let you have the trimmings.
Copyright 2000 Monica Resinger
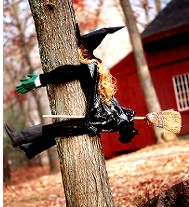
Witch Crash This witch may have failed driver's ed., but she's still got a few tricks up her sleeve namely, the ability to provoke hysterics in every trick-or-treater who sees her.
Materials
Black adult-size sweatpants
Black adult-size turtleneck
Four 1x4-inch wooden boards
Handsaw
Hammer and nails
Black boots
Broom
Green dishwashing gloves
Trash bag with drawstring top
Wig or skein of thick yarn
Store-bought witch's hat
Step 1:
First, choose a crash site for your witcha tree with a trunk that's sturdy, yet not huge in circumference. Ideally, the tree should also be highly visible to passersby.
Step 2:
Measure the sweatpants' legs and cut two of the boards to a few inches longer than the pants. Slide the wooden legs into the sweatpants andwith an assistant's helpnail a leg onto each side of the tree 3 or 4 feet above the ground and parallel to it. For the best illusion, you'll want to have at least a few inches of the legs extending toward the witch's back (so that she appears to have hips).
Step 3:
Slide the boots onto the ends of the legs.
Step 4:
Secure the broom in placeroughly parallel to the groundby nailing it to the tree and one of the wooden legs.
Step 5:
Pull the trash bag drawstring tight, then nail the bag in place so it hangs down as a cape. Secure the cape at the bottom as well, so it doesn't blow around.
Step 6:
Lastly, nail the wig to the tree, cover it with the hat, then nail the hat in place. If you don't have a wig, simply cut a bunch of thick yarn into long strands and tie them together at the top.
|